
Laser projector specifications
If you are buying a laser projector, you should understand the manufacturer’s specifications. The gray rectangle headings on this page list the items that are typically seen on a spec sheet. Click on a heading to open it up and see details.
Making a wise buying decision
If you are buying from an ILDA Member, they are bound by the Code of Ethics and the Code of Business Practice. If there is a problem, you can file an Ethics Complaint in order to have the Ethics Committee review the issue. They will look at both sides, and will issue a recommendation to help solve the problem. If the ILDA Member does not follow the recommendation, then the Ethics Committee and Board of Directors can take further action up to and including revoking the Membership.
Note that ILDA does not monitor or certify how manufacturers measure laser power, divergence, etc. For this reason, we cannot guarantee that any given laser projector will meet the claimed specifications.
Power, divergence and color
- Laser powerOpen or Close
Laser power is measured in milliwatts or watts. 1000 mW = 1 W. To give an example, 500 mW is the same as 1/2 watt.
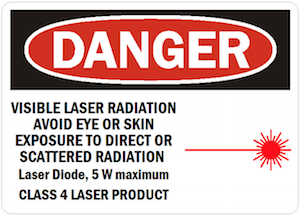
To know the power of a laser projector, do NOT rely solely on the Warning/Danger label, or the model name/number.
• The Warning or Danger label required on laser equipment will state a power level which is at or above the maximum the laser could ever produce. In some cases, the Warning/Danger label’s stated power level may be well above the maximum the laser could ever put out.
For example, the label may state that the power is “<5 W” when the laser beam is only 2 watts. The label is true — the laser emits less than 5 watts — but the Warning/Danger label in this case is stating a power that the laser could not reach. (This may be done to have an extra “safety factor”: e.g., treat the laser as if it were 5 watts. It may also be done so that a limited range of labels needs to be printed and kept in stock; for example, for use on lasers less than 1 watt, on lasers between 1 and 5 watts, on lasers between 5 and 10 watts, etc.)
• Similarly, the laser name or model number may or may not accurately reflect the power of the laser beam. A projector called “Beautiful Laser 2500” could be 2500 mW (2.5 W) at some point in the beam path— or it could be less powerful. It could even be that the name or model number is unrelated to the laser power.
Understanding how power is specified
Different manufacturers have varying ways of specifying the output power of their laser projectors. The two major methods are 1) specifying the total laser power coming out of the output window, and 2) specifying the total laser power measured inside the projector. These two methods are described below.
It is important to understand the difference. This is because:
1) The total power coming out of the output window is what you will actually be working with during the performance of a standard laser display or laser show.
2) The total power coming out of the output window is used for most laser safety compliance calculations and measurements; for example, to determine the maximum power that a performer, stagehand or the audience might be exposed to. (The power inside the projector would only be taken into account to determine technicians’ potential exposure during maintenance and servicing.)
Method 1: Specifying laser power coming out of the output window
Many manufacturers specify the maximum amount of laser power coming out of the output window, when all of the individual laser modules inside the projector housing are being used.
For example, in a “white light” RGB laser, this would be when all three lasers — red, green and blue — are at full power. The measurement is taken outside the projector housing, after the beam has passed through the output window.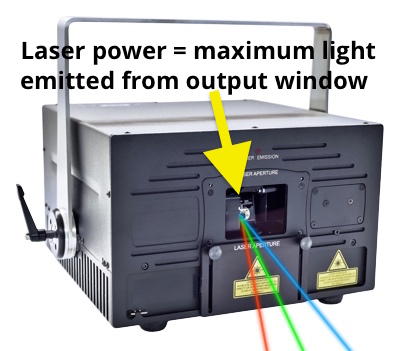
In the image above, the yellow arrow points to the output window, also called the “laser aperture.”
Under this method, the laser power is the maximum available outside the laser (e.g., after the output window).
This method clearly defines the amount of real laser power you will have to work with, for the performance of a laser display or show.
Also, this method is used in laser safety calculations. This is because any potential exposure to performers, stagehands or the audience depends on the power coming out of the projector (Method 1), not the power inside the projector (Method 2).
Method 2: Specifying laser power measured inside the projector
Some projector manufacturers measure the power of their laser system, by defining the amount of power produced inside the projector housing. This is done by adding up the power of the individual laser modules, before the beams go through any optics or the output window.
For example, in a “white light” RGB laser, this would be done by adding up the maximum power output of the red laser module, the blue laser module and the green laser module.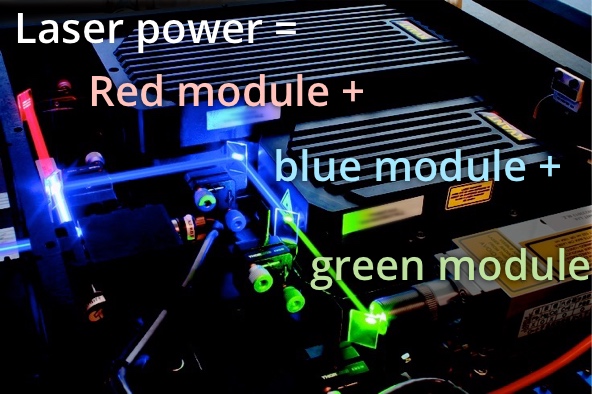
Because the beam must then go through combining optics and then bounce off steering and scanner mirrors, inevitably there will be some power lost before the beams finally exit through the output window. The amount of power lost varies depending on the quality of the optics, the beam path design, and other factors. Typically, on the order of 15-30% of the power is lost inside the projector, as the beams travel through the optical path.
When this second method of defining a laser’s power is used, it is important for you as a customer to be able to correctly understand and interpret the amount of power your laser is capable of producing, at the output window.
There are some terms you might see that are used to describe laser power measurements. One term is Minimum/Maximum Output Power:
• The “Minimum” output power usually means the amount of power the laser modules will produce inside of the laser housing (see diagram above).
• The “Maximum” output power usually means the amount of power the laser could produce if the modules are more powerful than their normal or typical power output.
Another term is “Typical Output Power”. This also usually means the amount of power the laser modules will produce inside the laser housing.
“Apparent Brightness” is another term used, which specifies the amount of “apparent” visibility the laser may offer. This is based on the fact that the eye perceives different colors as being more or less visible, and that different ways of producing a beam may make it more of less visible in different situations. For example, a 638nm red appears to the eye approximately three times brighter than a 655nm red (which is a deeper color) at the same power. As another example, a very narrow, tight laser beam may hold its brightness over a very long distance, but a wider, less focused laser beam may appear brighter over short distances. The term “Apparent Brightness” does not denote the amount of power the laser modules produce, nor does it denote the actual output power of the system at the output window.
Other laser power considerations
No matter which method is used to determine specifications, only the visible laser light should be measured. Some laser types produce invisible infrared light along the same beam path (co-axial) as the visible light. If a power meter is used that is sensitive to both IR and visible, and the person measuring does not take extra steps to eliminate the IR, the meter’s reading can mistakenly indicate that the visible light is more powerful than it really is.
Also, some manufacturers may intentionally provide “headroom” on the laser, usually around 10% of the specified power. This is done so that as the laser ages, the drive current can be tuned up to compensate for the loss of efficiency. With some types of lasers such as OPSLs, the laser can be overdriven to give greater power, but this will adversely affect the lifetime. If the end user overdrives the laser, this may invalidate the warranty. - DivergenceOpen or Close
Divergence is a measure of the rate at which the beam spreads.
• A low beam spread, such as less than 1 milliradian, results in an especially narrow beam. Fiber laser technology and OPSL lasers have a very low divergence of around 0.2 milliradians.
• For diode and DPSS Class 4 lasers (above 500 milliwatts), the divergence typically will be in the 1-3 milliradian range.

A low divergence beam (top) vs. a higher divergence beam (bottom)
You may or may not see divergence listed on specifications. One reason for not listing it is that divergence can be difficult to measure. A laser also may change divergence depending on the power setting; at low power the divergence will be less (narrower) than when the laser is turned up to maximum output.
It can be helpful if a specification lists the beam size at a given distance; for example, “This laser produces a spot size of 1.5 cm at 25 meters.”
Safety implications: All other factors such as power being equal, a low-divergence beam is a greater potential safety risk than a high-divergence beam. A narrow beam concentrates more light in a given area, compared with a wider beam of the same power.
In a show situation, however, it may be possible to reduce the power of a low-divergence beam to give the same visual effect as a higher-power, wider beam. So this could help equalize the potential safety risk.
The key is to know the irradiance — the light power spread over a given area — of the laser, and ensure it does not exceed laser safety standards and regulations. A discussion of irradiance is beyond the scope of this webpage; for more information see the Links and Resources page at LasershowSafety.info.
Multiple color projectors: In projectors using multiple lasers, such as a “white light” RGB laser, one characteristic to look for is that the divergence of each color is roughly equal. Otherwise, a line drawn with the laser can have colored edges, since some beams will be “fatter” than the others.
Measuring divergence: There are two ways to measure divergence: “half angle” and “full angle.” If you are comparing specs from different manufacturers, be sure to compare half-to-half, or full-to-full. - Colors (power and wavelength balance)Open or Close
The projector’s available beam colors are usually specified both in power and in nanometers. The latter determines the color of the beam. Visible light is in the range of about 400 nanometers (violet) to 700 nm (deep red).
For a multiple-color “white” laser, the beams may be specified similar to this: “Red 700 mW @ 637 nm, Green 500 mW @ 532 nm, Blue 800 mW @ 450 nm”.
Powers: If you add up the powers — 700+500+800 — the total may be more than the laser power just after the output window. That’s because in specifying the colors, the manufacturer is probably reporting the output of the individual laser modules inside the laser projector, before they go through any optics and then the output window. What is important is the relative balance of powers, between each of the colors.
Color balance: To get a good mix of white light, you need more red and blue than green. This is because the human eye is more sensitive to green light, than to red or green.
One ILDA Member suggests the following ratio gives a good white balance: 1.4 units of red at 637 nm, 1 unit of green at 532 nm, and 1.6 units of blue at 450 nm.
The exact balance may not matter since the laser projector and/or control software will be able to adjust exactly how much red, green and blue are mixed together. In general, what you don’t want is a gross imbalance where you are throwing away too much of one or two colors in order to get a good white mix. (This imbalance might be OK in a projector intended primarily for beams where for example, you have a lot of green that can make high-powered beams, yet there is still some red and blue for variety.)
Wavelengths: The exact red or blue wavelength can be important. A laser with a 633 nm red appears about eight times brighter than a laser with the same power but a wavelength of 670 nm.
Below is a table showing the apparent visibility of some common laser wavelengths, where 555 nm green is at 100% brightness.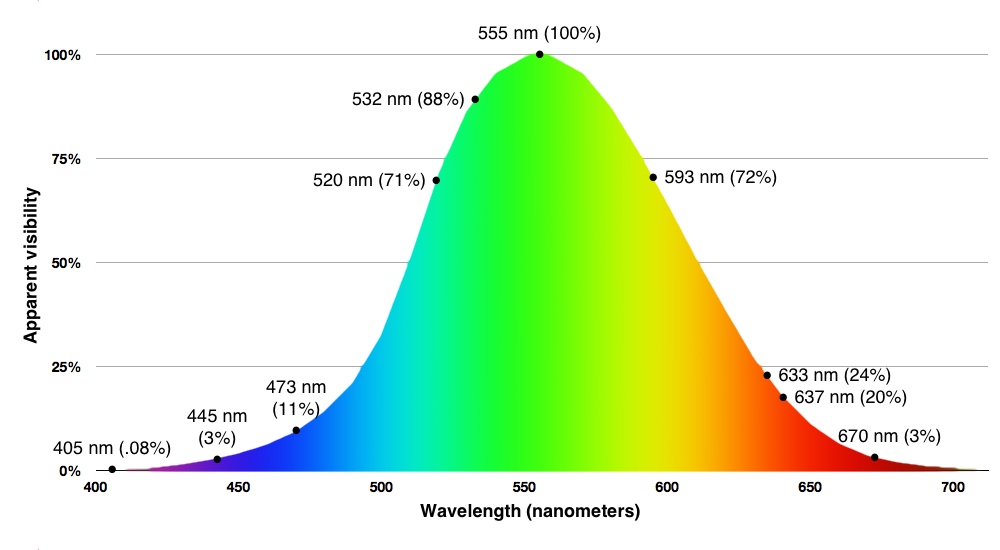
- Modulation (how color brightness is varied)Open or Close
There are two ways to change the brightness of the laser beam.
• TTL or digital: In this method, the laser beam is either on or off. For a three-color “white” light RGB projector, this gives eight total combinations: “white” (R+G+B all on), yellow (R+G), cyan (G+B), magenta (R+B), red only, green only, blue only and “black” (all off).
• Analog: In this method, the beam brightness can be varied, usually in 256 steps per color. Since there are three colors, this gives 256 x 256 x 256 or 16.7 million possible color combinations. Modulation speed may be stated in Hertz, or how many times per second the color can be changed; for example, “50k Hz” or 50,000 times per second.
Keep in mind that modulation is actually complex.
For example, within a single color, the modulation may be non-linear. This means that as you gradually turn down the color, nothing may happen for a while then suddenly the beam may quickly dim. Or, it may be difficult to get a very faint beam — there may be a minimum brightness “floor”.
Also, across colors the modulation level may vary. For example, as you turn down a “white” RGB beam, the color may vary since the green (for example) may dim at a different rate than the red and blue. This may happen when different technologies are used for the colors; such as DPSS for green and diodes for red and blue.
Fortunately, software may have color balancing features that compensate for the modulation non-linearities. You “train” the color palette one time, then the software remembers what settings are necessary for each color, at each brightness level.
Scanner performance
- Scan speed and angleOpen or Close
Scanner speed is a key factor in determining the best intended use of a laser projector.
• For graphics, the scanners must be able to “stop on a dime” in order to create sharp drawings and text. The faster the scanner, the more detailed an image can be, before it starts to flicker too much.
• For aerial effects, the speed of the scanners is less important. Excellent aerial effects can be achieved with relatively slower scanners since the patterns used for most aerial effects are not nearly as complicated as graphic patterns.
Measuring scanner speed
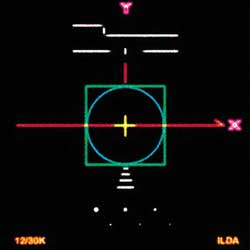
Scanner speed is measured using the ILDA Test Pattern shown here. There are a number of different scanner and blanking/color parameters that are tested by looking at how the shapes are drawn and how they line up.
The result is typically given in “thousands of points per second” or “K”; for example, “30,000 points per second” or “30K”.
For laser show use, the “points” are generally referenced to the ILDA Test Pattern frame. The version shown here is drawn using 1,192 points. A “30K” scanner can display this frame 25.2 times per second (e.g., 30,000 points every second) without distortion in the image. However, a slower scanner may be able to only accurately draw the frame — for example — 16 times per second, meaning the scanner would be rated at 19,072 points per second, or about 19K.
Larger “K” numbers indicate faster scanning speeds. However, there is a complex relationship between speed, accuracy, the longevity of the scanners and the appropriateness of the scanner mirrors for a particular type of laser. Larger “K” numbers are not always “better,” and some laser projectors require scanners with smaller “K” numbers to get maximum brightness.
Scan angle
A very important specification is the scan angle that was used with the ILDA Test Pattern.
• For scanners rated at 30,000 points per second (30K) or more, the scan angle used with the ILDA Test Pattern is 8 degrees peak to peak. This is the generally accepted industry standard for graphics scanning.
• For scanners rated at 12,000 pps (12K), the scan angle used with the ILDA Test Pattern is 15 degrees. These scanners may be able to do most beam patterns fine, but graphics will have rounded edges and/or may flicker.
The scan angle is shown in red below.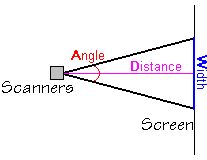
This is important because the wider a scanner goes, the harder it is for it to track the points at high speed. Conversely, it is easy to scan accurately at a narrow angle.
Sometimes you may see the ILDA Test Pattern being specified at a non-standard angle, such as “Our scanner displays the ILDA Test Pattern correctly at 30,000 points per second at a 4 degree scan angle.” But what this really means is that the scanner cannot meet the 30K pps/8 degree ILDA standard. Such a scanner would not normally be chosen for professional-quality graphics.
For more information on the test pattern and scan angle, see the ILDA Test Pattern standard.
Controls
- Control inputs: ILDA, DMX, otherOpen or Close
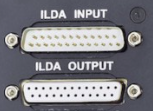
Many projectors have an ILDA input. This is a DB-25 connector that allows input of signals from a computer or other external laser controller system. (It is known as an “ILDA connector” since the ILDA Standard Projector specification describes this connector and its pin assignments.)
Be careful; just because there is a DB-25 connector and it is labeled “ILDA” does not necessarily mean that it is wired correctly. For example, we have seen projectors that would (unsafely!) output a beam when it was supposed to be turned off.
Projectors also may have built-in laser controllers. These may have Ethernet or other types of connectors to allow remote control.
Some projectors may be controllable by the DMX stage lighting protocol.
The projector manufacturer should specify the control method(s). - Other projector controlsOpen or Close
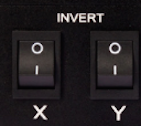
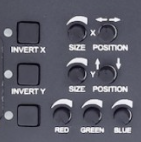
A projector may contain controls that directly change the laser signals. This can be convenient to set up the projector without having to change the laser control software.
For example, an X-invert switch will invert the X axis; this makes a mirror image — very useful if you are rear projecting vs. front projecting. There may also be controls to adjust the size and position of the X (horizontal) and Y (vertical) axes.
The individual colors may have knobs or trimpots, allowing you to easily tweak the color balance.
Laser safety
- Laser classOpen or Close
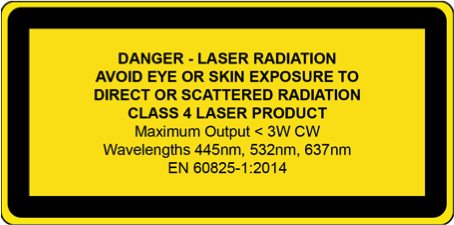
The specifications should state the laser safety class. This will also be printed on the laser’s safety label.
The class indicates the hazard potential of the laser product under specific measurement conditions and normal operation, and is not necessarily a measurement of the total laser power.
Class 3B is for projectors with total output power between 5 and 500 milliwatts, and Class 4 for projectors with power 500 mW or more. (500 mW is the same as 1/2 watt.)
Some very low-cost projectors may be Class 3R (FDA/CDRH Class IIIa), which is between 1 and 5 milliwatts. However, 5 milliwatts is not very visible; it is suited for a home or small room.
Generally, semi-pro and professional laser projectors will be Class 3B or 4. - Basic and required safety featuresOpen or Close
Most countries have laser safety laws requiring certain features on a projector. For example, in Europe, projectors must have safety features specified by the Laser Product Safety Standard EN 60825-1:2014 to be compliant with “CE” marking requirements.
In the U.S., these safety features include the following:
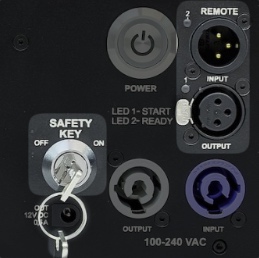
• A keyswitch or other method to assure the projector cannot be turned on except by an authorized person.
• A capability to remotely terminate all laser emissions which is sometimes called a “remote interlock connector." In some cases projectors will feature a port on the rear of the laser that would allow an emergency stop box to be connected. This box usually features a large “mushroom” type button and sometimes a key switch that will allow the laser’s emissions to be instantly terminated in the event of emergency. Some laser projectors or installations feature other means of accomplishing this requirement, but in all cases there should be a reliable means of instantly terminating all laser emissions for safety beyond pulling the power plug out of the wall or something similar.
• A power supply reset. If power is lost to the projector, as in a power failure or if the interlock connection is broken, the laser will not automatically come back on after power is restored. Instead, an operator must manually restart the laser after power is restored.
• An emission indicator. This is usually a light; it indicates more than just that the projector power is on. It indicates that laser light is about to start or is actually being emitted.
• Proper labeling. This includes an aperture label, the laser safety “Caution” or “Warning” label, and the manufacturer’s name and address.
All projectors sold into the U.S. must be certified by the manufacturer or distributor to the U.S. Food and Drug Administration’s Center for Devices and Radiological Health (CDRH). Anyone using a Class 3B or 4 laser projector is a manufacturer under CDRH regulations and must themselves have a variance from CDRH.
This section is not the place to fully discuss CDRH equipment and performance requirements. For more information, see the Links and Resources page at LasershowSafety.info.
In addition to laser safety features, the projector may also have other safety features such as an eyebolt for a safety cable, so that if the projector slips from its mounting bracket, the cable will catch the projector. - Additional safety features (audience scanning)Open or Close
Some projectors may have extra laser safety features, such as the ability to monitor the laser power in order to do audience scanning. These may be built-in, or may be optional extras.
If you do not have such a safety system, normally you cannot do audience scanning with the projector — the beam must be kept from any audience access. (There may be alternative methods of audience scanning that do not require monitoring by the projector. A discussion of these methods is outside the scope of this page.)
Other features to consider
- Included accessoriesOpen or Close
The specifications may list the included accessories. These may include:
• A power cable
• An ILDA, DMX or similar cable to allow connection to a laser control system
• The key for the keyswitch, and perhaps a spare key
• A remote control box with cable, for turning the laser on and off remotely
• Mounting bracket (if not built into the projector)
• A user manual - Other specificationsOpen or Close
Other specifications would include typical ones such as:
• Weight
• Dimensions
• Power requirements (e.g., 110/220 VAC)
• Power consumption (how many amps the projector draws) - WarrantyOpen or Close
The warranty should clearly spell out terms and conditions regarding suitability for use, workmanship and materials, refund conditions (if any), term of warranty, any exclusions, etc.
- Photos and other marketing materialOpen or Close
On the sales webpage or brochure, there may be pictures of laser shows, beams and graphics.
You may want to confirm with the manufacturer that the projector is actually capable of doing the pictured shows, beams and graphics, with the same quality.
• For example, photos may show good quality graphics, even though the projector’s scanners cannot accurately recreate those graphics at a reasonable speed (no flicker) and scan angle.
• And there may be photos of impressive multiple projector laser shows, when clearly the projector being sold could only do one subset of the entire show.
Just be sure that you know what you are getting, before you decide to buy.
For more information, visit our other ILDA websites:


© 2007-2024 International Laser Display Association. All rights reserved.
Contact ILDA
No reproduction of the text or images on ILDA websites is allowed without written permission of ILDA or other copyright holders. "ILDA" and the ILDA logo are trademarks of the International Laser Display Association.
This site does not use cookies and does not track or gather information on individual visitors. Aggregate information is gathered by Google Analytics to determine overall visitor behavior. More information is on our Privacy Policy page.